Tag: SQL

NEW Elastic Database Jobs: SQL Agent For Azure SQL Database

Azure SQL Database is part of a strong, and strengthening overall Data story in Microsoft Azure. The flexibility of the platform, the scalability, both up and out, and the fact that so much functionality is just included all combine to show Azure SQL Database as a great offering. One thing that has been missing that the on-prem (or Azure VM) world continues to enjoy is SQL Server Agent. SQL Agent has long been used for the scheduling and execution of database maintenance tasks relating to indexes, statistics, and on and on. You’ve certainly been able to perform tasks against Azure SQL using PowerShell, Azure Automation, etc. But that familiar ability to schedule the execution of plain old TSQL using plain old TSQL just wasn’t there.

Debra Dove, Principal Program Manager on the SQL Engineering team at Microsoft, announced at Ignite 2016 in September that a shiny NEW Elastic Database Jobs was entering Private Preview. Note that there is an earlier version of Elastic Database Jobs currently in public preview in the Azure Portal. This new version I am showing today will be the path going forward and will replace that current version in the portal. The NEW Elastic Jobs does not include a Portal experience at the time of this writing.

MemeThe new Elastic Database Jobs are designed to echo well the functionality the folks working with SQL Server are accustomed to on-prem with SQL Agent. But it’s even better than that. There are many features that are just baked in that you no longer have to worry about. I’ve presented on the new Elastic Jobs as part of a larger presentation on the overall Elastic tools associated with Azure SQL Database a handful of times. That presentation is called Azure SQL Database Elastic Boogie and references Marcia Griffith’s hit song Electric Boogie (The Electric Slide). Yeah. I know. That will explain the use of the word boogie all over the place.

Even with it just being a very new private preview, my experience has been a great one. Huge kudos to Debra and her team on that.

Note: There are several offerings around Azure SQL Database that include the word “Elastic” in their name: Elastic Database Pools, Elastic Database Query, the Elastic Scale Client .Net library, and Elastic Database Jobs. They all include “Elastic” in order to note how they help you with flexibility in a scaled out/up data tier in Azure SQL Database. You CAN use them all together; it often makes sense to do so. But none of them are requirements for the others. For example, your databases DO NOT need to be in Elastic Database Pools to take advantage of Elastic Database Query, the Elastic Scale Client, or the NEW Elastic Database Jobs.

If you would like to participate in the Private Preview, then feel free to skip down to the Requesting Private Preview Access section at the bottom. I will understand if you want to bypass the transcendent experience of my walkthrough… I guess…

Let’s dig in.

High Level Features of Elastic Database Jobs

1. Asynchronous execution of scripts

This is not meant for interactive querying. You can use Elastic Database Query (currently in public preview) for that. The scripts in your jobs will execute in the background against each target database.

2. Dynamic resolution of target databases

Elastic Database Jobs introduces a feature called a Target Group. When you create a job step, you specify the Target Group for which the job step should execute. Target groups can contain “include” or “exclude” references to Azure SQL Database Servers, Databases, and Elastic Database Pools. When using a Server or a Pool, the targets will be the Databases within those Servers or Pools. Since you can specifically create “exclude” entries in Target Groups, this lets you run your job against, for example, all databases on Server01 EXCEPT DatabaseA.

When the job runs, it starts by querying the entries in the Target Group in order to determine which databases should be targeted. It does this with every execution to make sure the list of targets is accurate at that moment. This is a fantastic feature. In the future, the team plans to allow you to target Resource Groups and Tags as well. I KNOW! RIGHT?! So cool.

Give or take certain special cases around data sovereignty (like Germany and China, for examples), you can execute jobs against databases in any Azure region using a single Elastic Jobs account.

3. Management using TSQL

Currently, during the private preview, you can only manage Jobs using TSQL. However, in the future, they plan to add ability to do so via REST APIs, PowerShell, and the Portal. REMINDER: The Elastic Database Jobs available in the Azure Portal at the time of this writing is the older version, not this new version.

4. Script execution guarantees

The Elastic Jobs engine guarantees “at least once” execution against all target databases. So, if a connection to a particular target databases fails, the engine itself includes configurable retry logic to keep making attempts to connect to that database to execute the job script.

The engine also guarantees that each job will only support one concurrent execution at a time. Suppose you have a job that typically executes in 30 seconds and you run that job every five minutes. If the execution of that job against DatabaseA is taking longer than expected and it still running when five minutes passes and the next execution should begin, the engine will skip DatabaseA and make note in the execution history that a previous execution is still running.

5. Reliable collection of query results to a single table (no duplicates)

You can execute a job that will query all the target databases and bring the results back to a single table for use in reporting, etc. Even if that job must retry against a particular database, it will ensure that no duplicates from multiple attempts are saved to the final destination table. Hereafter, I will refer to the database you use for this purpose as the Jobs Results DB. You can write to a database you use for other purposes as well. I just keep mine dedicated for organizational purposes.

This is a fantastic way to pull information from a scaled out data tier into a central repository for reporting and analytics scenarios.

A Quick Note About Scale

We have teams within Microsoft that rely on this technology to stay within strict reporting SLAs. Those teams have a large infrastructure they use with Azure to manage their business. The Elastic abilities within Azure SQL Database in general and Elastic Database Jobs in particular serve them well. We also have a customer using Elastic Database Jobs to manage a data tier of more than 130,000 Azure SQL Databases. This technology is HUGE for them.

Elastic Jobs Management Database

Once the private preview is activated for your Azure subscription (I will cover this at the end), you will execute some PowerShell to create an Azure SQL Database for the orchestration of Elastic Database Jobs. You can liken this to the role that the msdb system database plays in the on-prem SQL Server world.

This database must be an S2 (currently $75/month) or higher. So, if you want to play with this using Azure credits from an MSDN subscription, you will likely want to create this only when you will be working on it and destroy it when you are done. For the private preview, that is the only cost you really have. You pay for the database, and that’s it. I don’t have information to share on what the pricing will look like at general availability.

Note that you do not need to have the management database, which I will hereafter refer to as the Jobs DB, on a dedicated server. I just chose to do so in my own environment for organizational purposes.

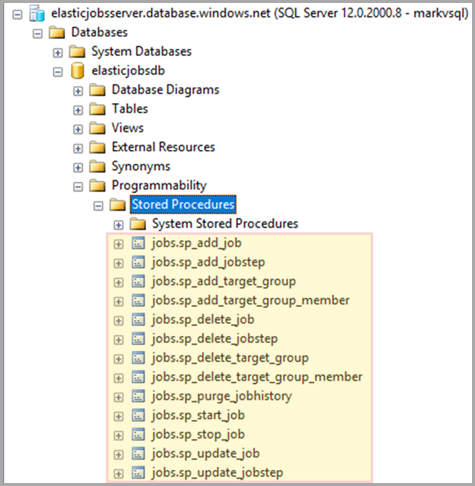
In the Jobs DB you will notice some familiar stored procedures, as shown in my Jobs DB in Figure 1.

Figure 1

image

In Figure 1, you can see sp_add_job, sp_add_job_step, etc., just like in msdb. You use these stored procedures for creating and managing your jobs, job steps, etc.

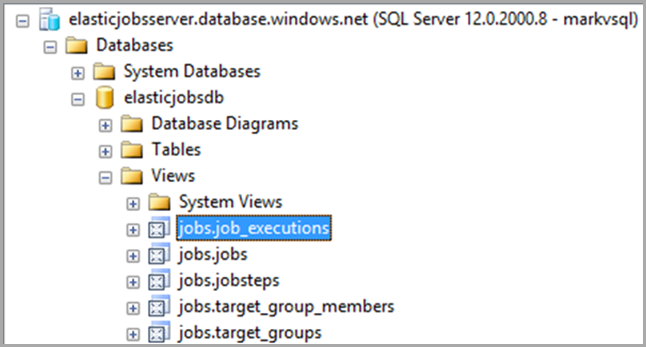
This database also contains a view you can use for querying the history of job executions, aptly named job_executions. You can see this along with some other useful views in Figure 2.

Figure 2

image

Security Setup

For Elastic Jobs to work properly, there are some credentials, logins, and users that must be created.

First, in the context of the Job DB, you need to create a Database Master Key and two database scoped credentials.

 
-- Create a db master key using your own password. 
CREATE MASTER KEY ENCRYPTION BY PASSWORD='NOT 12345';
GO

-- Create a database scoped credential for job execution.
CREATE DATABASE SCOPED CREDENTIAL elasticjobcred
WITH IDENTITY = 'jobcred', SECRET = 'NOT 12345';
GO

-- Create a database scoped credential for the master database of servers.
CREATE DATABASE SCOPED CREDENTIAL elasticmastercred
WITH IDENTITY = 'mastercred', SECRET = 'NOT 12345';
GO

The jobcred credential will be used for executing the jobs on the targets databases. The mastercred credential is used to the dynamic determination of Target Groups members on target Servers (including the servers housing target Elastic Pools).
 
Next, in the context of the master data on each server that houses databases that will be targets (including the server housing the Jobs Results DB), you need to create a login for the jobcred and mastercred as well as a user mapped to the mastercred login.
 
/* EACH TARGET SERVER (including server to house Jobs Results DB */

/* master database */

CREATE LOGIN jobcred
WITH PASSWORD = 'same password used for jobcred secret';
GO

CREATE LOGIN mastercred
WITH PASSWORD = 'same password used for mastercred secret';
GO

CREATE USER mastercred
FOR LOGIN mastercred
WITH DEFAULT_SCHEMA = dbo;
GO

Then, on each database that will serve as a target, including the Jobs Results DB, create a jobcred user and add it to the role or roles appropriate for the tasks to be executed on that database.
 
/* each target database (including Jobs Results DB) */

CREATE USER jobcred
FOR LOGIN jobcred
WITH DEFAULT_SCHEMA = dbo;
GO

/* Add user to the database appropriate role(s) */
EXEC sp_addrolemember N'db_owner', N'jobcred';
GO
 
Note: I used db_owner merely for simplicity of my own demo environment. You can and should make sure the jobcred has only the rights necessary to perform the intended operations.

My Environment

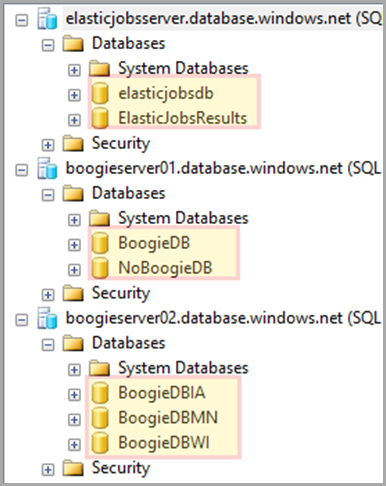
I think it makes sense to quickly show the environment I use for this demo, which is shown in Figure 3.

Figure 3

image

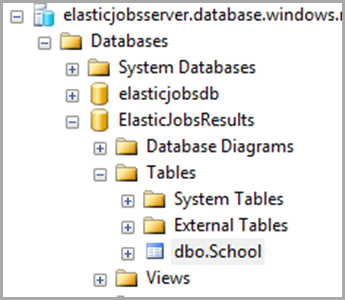
My elasticjobsserver houses two databases: elasticjobsdb, which is my Jobs DB, and ElasticJobsResults, with is my Jobs Results DB, to which I save query results.
 
Boogieserver01 houses BoogieDB, and NoBoogieDB, both of which are empty.
 
Boogieserver01 houses BoogieDBIA, which contains data I fabricated about school children selling chocolate in Iowa. BoogieDBMN is the same for Minnesota and BoogieDBWI is for Wisconsin.
 
It is important for the walkthrough to note that I have databases on more than one server.
 

The Schema Update Walkthrough

Once the environment is ready to go, I need to create a Target Group. My group is called BoogieServerGroup.
 
-- Add a target group containing server(s)
EXEC jobs.sp_add_target_group 'BoogieServerGroup';

Then we need to add a member to this group, in this case boogieserver02.
 
-- Add a server target member
EXEC jobs.sp_add_target_group_member
'BoogieServerGroup'
, @target_type = 'SqlServer'
, @refresh_credential_name='elasticmastercred'
, @server_name='boogieserver02.database.windows.net';
 
You can see in the code above that the @target_type is SqlServer and I am specifying the mastercredential that will be used for querying the list of databases on that server when jobs using this Target Group execute. We can view the members of that target group via the jobs.target_group_members view.
 
-- View members of target group
SELECT
target_group_name
, membership_type
, target_type
, server_name
FROM jobs.target_group_members
WHERE target_group_name='BoogieServerGroup';

This leads to the results in Figure 4.
 
Figure 4
 
image
 
Notice that this is an Include member of the SqlServer target type. As noted earlier, you can create Exclude members as well. Those will be skipped when the Target Group is used for job execution.
 
Now, it’s time to create a job. This job will house a step to create a new table, dbo.ElectricSlide, in all target databases.
 
-- Add job for create table
EXEC jobs.sp_add_job @job_name='CreateTableElectricSlide'
, @description='Create Table ElectricSlide';

Then we need to create a job step for that job. At this time in the private preview, each job can have a maximum of one job step and that job step must be TSQL. Given that this step could be executed against databases multiple times, it is important that the query be idempotent.
 
-- Add job step for create table
EXEC jobs.sp_add_jobstep
@job_name='CreateTableElectricSlide'
, @command = N'IF NOT EXISTS (SELECT * FROM sys.tables
WHERE object_id = object_id('
'ElectricSlide''))
CREATE TABLE [dbo].[ElectricSlide]([ElectricSlideId] [int] NOT NULL);'

, @credential_name= 'elasticjobcred'
, @target_group_name='BoogieServerGroup'

We can view the job step definition.
 
-- View the job step definition
SELECT
[job_name]
, [step_id]
, [command_type]
, [command]
, [credential_name]
, [target_group_name]
FROM [jobs].[jobsteps]
WHERE job_name = 'CreateTableElectricSlide';

This produces the results in Figure 5.
 
image
 
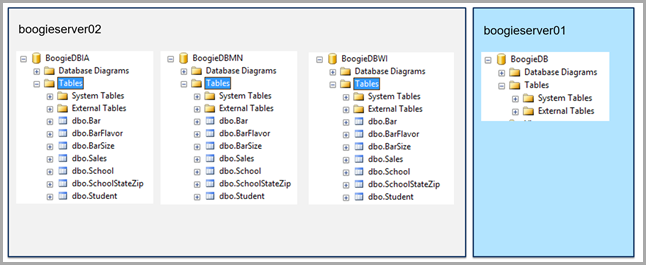
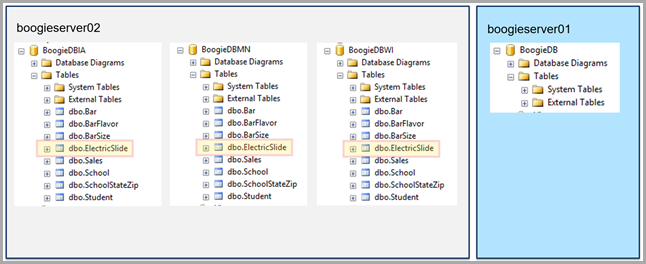
A quick look at the Boogie databases on both servers shows none of them contain a table called dbo.ElectricSlide, as shown in Figure 6.
 
Figure 6
 
image
 
Let’s execute our job.
 
-- Execute the latest version of a job 
exec jobs.sp_start_job 'CreateTableElectricSlide'

Once our job is running, we can query the latest (in this case, currently running) execution of the job.
 
-- View latest execution
SELECT
is_active
, lifecycle
, last_message
, target_type
, target_group_name
, target_server_name
, target_database_name
FROM jobs.job_executions
WHERE job_name = 'CreateTableElectricSlide'
AND job_execution_id =
(
SELECT job_execution_id FROM jobs.job_executions
WHERE step_id IS NULL and create_time =
(
SELECT MAX(create_time)
FROM jobs.job_executions WHERE step_id IS NULL
)
)
ORDER BY start_time DESC;
GO

If we execute the above query immediately after starting the job, our results look like Figure 7.
 
Figure 7
 
image
 
Notice that the bottom row is WaitingForChildJobExecutions. In this case, the one child job running is the first row with the target_type of TargetGroup and the target_group_name of BoogieServerGroup. This is the child job that is querying the master database on boogieserver02, the only member of BoogieServerGroup, to find the databases on which to run the script in the job step.
 
After a few seconds, running that same query produces the results in Figure 8.
 
Figure 8
 
image
 
The list of databases has been determined and a child job execution has been created for each target database.
 
Once the job completes, the results of that query look like Figure 9.
 
Figure 9
 
image
 
In this case, all child job executions have succeeded, and therefore the overall job execution has succeeded.
 
If we look again at our 4 Boogie databases (3 on boogieserver02 and 1 on boogieserver01), we see what is in Figure 10.
 
Figure 10
 
image
 
All of the databases on boogieserver02 now have a dbo.ElectricSlide table. BoogieDB, since it is not on boogieserver02, does not.
 
Let’s add the BoogieDB database on boogieserver01, but only that database, to our BoogieServerGroup target group.
 
-- Add a database target member
EXEC jobs.sp_add_target_group_member
'BoogieServerGroup'
, @target_type = 'SqlDatabase'
, @server_name='boogieserver01.database.windows.net'
, @database_name='BoogieDB'
 
Once we execute this, we can query out BoogieServerGroup again to list it members.
 
--View the recently added database in target group
SELECT
target_group_name
, membership_type
, target_type
, server_name
, [database_name]
FROM jobs.target_group_members
WHERE target_group_name='BoogieServerGroup';

The results now look like Figure 11.
 
Figure 11
 
image
 
Notice we have two different target_type values, SqlServer for boogieserver02 and SqlDatabase for the row for the BoogieDB database member. This shows that the same target group can contain members of multiple types.
 
Let’s execute our job again.
 
-- Execute the latest version of a job 
exec jobs.sp_start_job 'CreateTableElectricSlide';
 
This time, I’ll just show the final results of the job execution. See Figure 12.
 
Figure 12
 
image
 
Notice that only the BoogieDB database from boogieserver01, not NoBoogieDB, is included. After all, how can you have an ElectricSlide if you have NoBoogie?
 
If we look at all of the Boogie databases again, we see that they all now have the dbo.ElectricSlide table, as shown in Figure 13.
 
Figure 13
 
image
 
As you can see, the new Elastic Database Jobs can be huge boon when managing a scaled out data tier.
 

Query Results Walkthrough

In this walkthrough, we will query all the databases in our target group and bring the results back to a single table in my Jobs Results DB, ElasticJobsResults.
 
We will use the BoogieServerGroup target group for this next phase as well. However, we will remove the BoogieDB target member since that is an empty database and therefore does not have the table that is the target of our query.
 
-- Remove a server target member
DECLARE @mytarget_id uniqueidentifier

SET @mytarget_id =
(
SELECT target_id FROM jobs.target_group_members
WHERE [database_name] = 'BoogieDB'
);

EXEC jobs.sp_delete_target_group_member
@target_group_name = 'BoogieServerGroup'
, @target_id = @mytarget_id;

Now, when we query the BoogieServerGroup, it should only have 1 member, boogieserver02, as shown in Figure 14.
 
Figure 14
 
image
 
Let’s create a job for collecting results from the data tier.
 
-- Add a job to collect results
EXEC jobs.sp_add_job
@job_name ='ResultsJob'
, @description='Collection data from all databases';

Now we can add a job step for collecting those results.
 
-- Add a job step to collect results
EXEC jobs.sp_add_jobstep
@job_name='ResultsJob',
@command= N'SELECT DB_NAME() AS DatabaseName, SchoolID, SchoolName FROM dbo.School;',
@credential_name='elasticjobcred',
@target_group_name='BoogieServerGroup',
@output_type='SqlDatabase',
@output_credential_name='elasticjobcred',
@output_server_name='elasticjobsserver.database.windows.net',
@output_database_name='ElasticJobsResults',
@output_schema_name='dbo',
@output_table_name='School';
 
You can see this job step uses more parameters than our table creation example above. This one specifies the server, database, schema, table into which the results of the query are to be stored. In this simple example, I am merely querying the dbo.School table in each target database. I will bring the results back to my ElasticJobsResults database into a table called dbo.School. Note that this will create the destination table if it does not already exist. This is a good thing since the query results include a field that I do not have in my query.
 
Let’s go ahead and execute this job.
 
-- Execute the latest version of a job 
exec jobs.sp_start_job 'ResultsJob';

Here is my job tracking query again, this time look at ResultsJob.
 
-- View latest execution
SELECT
is_active
, lifecycle
, last_message
, target_type
, target_group_name
, target_server_name
, target_database_name
FROM jobs.job_executions
WHERE job_name = 'ResultsJob'
AND job_execution_id =
(
SELECT job_execution_id FROM jobs.job_executions
WHERE step_id IS NULL and create_time =
(
SELECT MAX(create_time)
FROM jobs.job_executions WHERE step_id IS NULL
)
)
ORDER BY start_time DESC;
GO
 
The final results are shown in Figure 15.
 
Figure 15
image
 
Sweet. We now have a dbo.School table in the ElasticJobsResults database, as shown in Figure 16.
 
Figure 16
 
image
 
Let’s query it.
 
SELECT * FROM dbo.School;
 
The results are shown in Figure 17.
 
Figure 17
 
image
 
Note that the results include the internal_execution_id of the child job that retrieved each record. So, the Elastic Jobs engine is providing some ready-made lineage information for us. I also want to point out that the SchoolID in my dbo.School table in all of my Boogie databases is an identity column starting at 10000. Each one includes only a single record. Therefore, in each database, the single school present has a SchoolID of 10001.
 
This is a super simple example of querying an entire data tier with a single query using Elastic Database Jobs.
 
I hope you can see how exciting this is for the Azure SQL Database story. So far, the reception has been great. I demoed it for a customer the other day and the response was, “WOW! This is EXACTLY what we needed.” The Data story in Azure just keeps getting better and better.
 

Requesting Private Preview Access

Debra and her team are looking for participants for the Private Preview of the shiny new Elastic Database Jobs. If you would like to participate, and I would encourage you to do so, please email me using my Microsoft address, which is mark dot vaillancourt at microsoft dot com. Include a brief description of your role and your environment. I will connect you with Debra, who can get you started.

2014 Microsoft Most Valuable Professional (MVP) for SQL Server

So… This happened:

Dear Mark Vaillancourt,
Congratulations! We are pleased to present you with the 2014 Microsoft® MVP Award! This award is given to exceptional technical community leaders who actively share their high quality, real world expertise with others. We appreciate your outstanding contributions in SQL Server technical communities during the past year.

I am so proud to receive this award from Microsoft. I can’t adequately explain how gratifying it is to know that my contributions to the SQL Community are seen as being so valuable as to be recognized by Microsoft.

I need to thank Microsoft as well as the many many fine people in the SQL Community who set an excellent example for how to make an impact. There are too many people to name without risking missing someone.

Holy cow…

PASS Summit 2013 Recap of Madness and Mayhem

Greetings! Another PASS Summit has come and gone. This was my third Summit and I have to say that I am truly hooked on this spectacular event. I had the privilege to be a bit more involved this year than in years past. I love when I can give some of my time and energy to help out an organization that has been hugely important for me in my career with SQL Server.

I spent much of Tuesday in meetings related to the PASS organization. There was the Regional Mentors meeting, the Chapter Leader meeting, and a chance to sit down with the Canadian Chapter Leaders. As a PASS Regional Mentor for Canada, that was great since I don’t often get the chance to see them in person.Summit 2013 Badge

Since it was already confirmed on Twitter, I would like to say that I will be working with SQL MVP and Winnipeg  SQL Server User Group chapter leader, Mike DeFehr (Blog|Twitter), on planning a SQL Saturday in his fine city. I am hoping I will get to go as well. I have never been involved in running a SQL Saturday and I thought helping Mike would be a great way to fulfill my role as a Regional Mentor and also give me the experience to better help others with their event planning in the future.

PASS invited me to be on the Blogger Core and have a seat at the Bloggers table for the keynotes this year. While it can be challenging to keep up with meaningful things to post while live blogging, I really enjoy it. I always get a lot out of it. You can read those posts at PASS Summit Keynote Live Blog – Day 1 and  PASS Summit Keynote Live Blog – Day 2 respectively.

When PASS invited me to serve on the Blogger Core, they also indicated I would have access to an Interview room. I had never interviewed anyone before, but it seemed like a great opportunity to capitalize on connections I had made at PASS BA Conference, Tech Ed North America, and past PASS events. I decided, with the fast pace of change occurring in Business Intelligence both at Microsoft and in the industry as a whole, that I should try to sit down with prominent Microsoft personnel to talk about their work and the future of Microsoft BI. Being a lowly blogger from Minneapolis, I didn’t expect to get very far, but I had to try. I was astonished at the access I was given. Listed in chronological order of when the interviews took place, I sat down with:

  • Matt Masson (Blog|Twitter), Senior Program Manager for SQL Server Integration Services
  • Kamal Hathi, Director of Program Management for Microsoft Business Intelligence
  • Kasper de Jonge (Blog|Twitter), Program Manager for SQL Server Analysis Services

I know! Right? For real.

Transcribing the audio from these interviews is taking a little time. Each interview will get its own blog post. I hope to have the first one released next week. I have to express my great appreciation to Matt, Kamal, and Kasper for giving of their valuable time to chat with me. I also need to say thanks to Microsoft’s Cindy Gross (Blog|Twitter) for helping with my connection to Kamal Hathi.

I also had the honor of wearing a SPEAKER ribbon on my Summit badge this year. It was my first time speaking at PASS Summit; a career milestone to be sure. I am happy to report my presentation, DANGER: The Art and Science of Presenting, went extremely well. And, despite presenting right after Dr. David DeWitt’s brilliant keynote and being on the other end of the Convention Center, there were very few empty chairs in my room. The feedback I have received so far is all very positive. Thanks to all who chose my session when there were so many great options to choose from.

While I ended up having to miss the public Q&A Session with the PASS Board of Directors, I do have some notes from the private Blogger Q&A with the executive committee. I will prep that for another post.

If you ever get the chance to go to PASS Summit, grab onto it with both hands. There’s nothing like connecting, sharing, and learning with a few thousand of your closest friends to get you jazzed about what you do.

GO

Surprise SQL Server 2012 Feature: “It’s Like Siri….For SQL Server.”

In conjunction with the official release of SQL Server 2012 today, Microsoft has announced a surprise feature that was kept under wraps for three years. Casper Marley, Senior Program Manager for Microsoft’s newly announced Whimsical Products division put it this way, “It’s like Siri…for SQL Server.” “Siri,” Apple’s intelligent assistant that ships with the IPhone 4S, responds audibly not only to voice commands, but questions as well. He then quickly put his IPhone back in his pocket as several members of the Windows Phone team strolled by the well-windowed conference room in which this interview took place.

“Here is one example which integrates with the Query Optimizer,” he said, excitedly sitting up straighter in his chair. He then went on to explain that this new feature, when detecting your tuning has resulted in a plan that is ten or more times more performant than the previous plan for that query, will play a .wav file that sounds like the sizzling of bacon on a griddle. “It’s our way of providing the immediate feedback that you’re really cookin’ now.”

“Another example,” explained Marley, “has been plugged into Resource Governor. When a user is affected by RG, they will now get an audible “No resources for you!” He sat back and chuckled at the brilliance of intertwining comedy and databases.

One feature of this new tool is somewhat controversial. “We all know what happens when you shrink a database, right?” Marley then sipped his coffee for several seconds, clearly building suspense. “Well, when you actually execute a SHRINK on a database, your screen will go dark for a moment. During that time, you will hear high pitched meows and some thumps. Then a well-known, bearded SQL Server expert will appear on the screen, a single tear on his cheek.” He then explained that this expert will then hold up a small furry object and say, “YOU SEE!? See what you did!?” How that made it passed QA, I will never know.

There are some Easter Eggs in there as well. Marley turned to his laptop and said, “Watch this one.” He opened a query window and executed a differential backup of a database. The screen got fuzzy for a moment and then an alien humanoid appeared. Below this alien were the words, “All your differential base are belong to us.”

“I’ll show you one last feature, “ Marley said, turning back to his laptop. He opened a new query editor window and wrote a query against a table that gets a lot of writes. Then, to my astonishment, he put a NO LOCK hint on that table. As soon as he executed his query, there was a loudly audibly “YOU FOOL!” as shouted by Gilbert Gottfried on a famous episode of Hollywood Squares.

Marley, clearly delighted with himself, closed the lid of his laptop and stood to shake my hand, signaling the end of the interview. “We’ll let the users find the rest.”

Well, there you have it. It only remains to see what the SQL community will make of these changes.

Facing The Challenge: Designing a BI Infrastructure With SQL 2008 (70-452)

On Monday, Feb 6th, I passed exam 70-452, Designing a Business Intelligence Infrastructure Using Microsoft SQL Server 2008. Hazzah. I am really excited about that, not because I get a shiny new MCITP certification, but because it validates how much I have learned. When I started working with SQL Server about 5 years ago, I started down the DBA track, even earning an MCITP in the SQL Server 2005 DBA track. It was not too long after that when I determined that Business Intelligence was where I really wanted to hang my career hat.

This post isn’t really about that, though. I have a process that I use to learn the material. I then use the exams to measure that learning. The process I have has worked pretty well. Actually, I am 6 for 6 when I commit to this process. Since it seems to work really well for me, I thought I would share it in case it may help someone else as well.

Typically, I like to use the Microsoft Press Self-Paced exam guides. I find them to be a great starting point and cover the key areas of the technology in question. In the case of exam 70-452, as of the time of this writing, there is not a Microsoft Press exam guide for that exam. Therefore, I instead chose Delivering Business Intelligence with Microsoft SQL Server 2008 by Brian Larson. I found it to be a great base for my prep for 70-452. In areas where I felt I needed to go deeper, I turned to Books Online.

My process consists of a few key steps.

1. I go through the text taking notes on the details of each topic. I make sure to make my notes in my own words and avoid taking anything word for word from the text. This helps a lot in that I must process the information more than once as I go.

2. The books I have used have all featured do-it-yourself style exercises during which you put what you learned into practice. I find this really valuable to gain at least some experience, particularly with skills I have never used in real life.

3. I read through the notes several times over, just like studying for test back in school.

It does not seem like much and certainly is not very elaborate. There are no tesla coils involved or anything. But sometimes it is the simple things people overlook.

Since I titled this post “Facing The Challenge,” I figured I should also show some of the faces I used during the process outline above.

 Confusion. Some of the content was confusing at first.


 Determination. I knew I had to commit myself to understanding all the concepts.


 Realization. Ah. NOW I get it.


 Blue Steel.


 Satisfaction. I passed. I dun learned something.


Well, there you have it.

Yes, Virginia, There Is A SQL-Themed Holiday Song

“Dear Mr. VSQL, I am 8 years old. My friends tell me that there are no SQL-themed holiday songs. My Dad says ‘If it’s on the Internet, it has to be true.’ Do you know of any SQL-themed holiday songs on the Internet I can show them?”

– Virginia O’Hanlon

Virginia, your friends have been misinformed. Please see below this song titled O Release Night, which is a SQL-themed version of the popular O Holy Night. Please feel free to show this to your friends. And, if they choose to start subscribing to my RSS feed, that would be fine, too. I hope you enjoy it and may you and yours stay safe and well this holiday season.

O release night, the maintenance window’s open.
It is the time to run my deployment scripts.
There’s DDL, and DML and stored procs
And functions and triggers, well, I hope not.
I load the file and connect to the DB.
With joyful hope, I hit the F5 key.

Fall on my knees to see the Messages pane!
An error in red, O M G, W T F!
Last night, I tested, twelve frickin times!

I go to the line referenced in the exception
And see where the Engine thinks I went wrong.
Led by the guidance of the crimson text
I find a difference between Test and Prod.
While deep in thought, I glance down at the systray
And see the date’s not what I thought it was.

I now need to stop and rollback all my changes.
Success! Success! I’ve undone all that I did.
I’m off to bed. This is not my release night!

Finding Foreign Keys

No, this is not a new initiative by United States Immigration and Customs Enforcement. I am talking databases.

I recently found myself in a situation where I wanted to find all the tables that referenced a particular table via foreign key relationships. I had heard that relying on the built-in dependency tracking (right-clicking the object in SSMS and choosing View Dependencies) was not always reliable. Indeed, SQL Server MVP Aaron Bertrand (Twitter) wrote a great blog post about ways in which sysdepends, sp_depends, and sys.sql_dependencies can lose touch with reality.

I figured I could find the info I wanted by querying the system catalog views. Here is the script I wrote using AdventureWorks as the sample DB.

USE AdventureWorks

GO


DECLARE 

      @ReferencedSchema varchar(1000)

    , @ReferencedObject varchar(1000)


SET @ReferencedSchema = 'HumanResources'

SET @ReferencedObject = 'Employee'


SELECT 

      rs.name + '.' + ro.name AS ReferencedObject

    , rc.name AS ReferencedColumn

    , ps.name + '.' + po.name AS ParentObject

    , pc.name AS ParentColumn

    , co.name AS ConstraintName

FROM sys.foreign_key_columns fkc

INNER JOIN sys.objects co

ON co.object_id = fkc.constraint_object_id

INNER JOIN sys.objects ro

ON ro.object_id = fkc.referenced_object_id

INNER JOIN sys.schemas rs

ON rs.schema_id = ro.schema_id

INNER JOIN sys.columns rc

ON rc.object_id = ro.object_id

AND rc.column_id = fkc.referenced_column_id

INNER JOIN sys.objects po

ON po.object_id = fkc.parent_object_id

INNER JOIN sys.schemas ps

ON ps.schema_id = po.schema_id

INNER JOIN sys.columns pc

ON pc.object_id = po.object_id

AND pc.column_id = fkc.parent_column_id

WHERE rs.name = @ReferencedSchema

AND ro.name = @ReferencedObject

ORDER BY 

      ps.name

    , po.name


Here are the results I get.

image

You can see that there are 7 foreign key constraints that reference the HumanResources.Employee table in my copy of Adventureworks. You can see that Parent object to which each of these constraints belong. And you can see the actual name of each constraint.

Feel free to take that query and tweak it to add information you would find useful. Also feel free to post it in comments here. I really want my blog to be a two-way street and would love to encourage debate.

I also encourage you to play around with querying the system catalog views. You can find some really cool stuff in there.

Jinkies! Passing MultiValue SSRS Parameters To Stored Procedures

SQL Server Reporting Services provides a great way to allows report users to select more than one value from the available values list in parameters, creating a multivalue parameter.

SSRS dynamically creates a comma separated list of the values selected by the user to pass in to the data source.

Great.

It also dynamically creates the Select All option at the top of the available values list.

Also great.

And, it is really easy to enable this feature.

Also also great.

But this great functionality does have a limitation right out of the box. You cannot pass a multivalue parameter to a stored procedure (see Using Single-Value and Multivalue Parameters).

Ruh roh. Not great.

In the past, I have had the data source sproc return all of the records and then used a filter on the data region to only show the records matching the values selected in the parameter. It got the job done, but returning records you are not going to use is suboptimal, to be sure.

Now, you may be thinking, dear reader, that I am a moron for choosing the above title for this post and then almost right away saying that you cannot do it. Well, provided that your database source is SQL 2005 or later, you actually CAN do it through the beauty of XML. And what is really really cool to me is that the amount of work you must perform to achieve this is miniscule. AND, it does not require much XML expertise, which I must confess, I currently lack. I have seen solutions for this obstacle involving the creation of user-defined functions, but I find this XML solution far more elegant and so easy to implement.

As I often do, I must shout out some thanks to Jason Strate (blog: www.jasonstrate.com, twitter: @stratesql) for showing me this.

You may be asking why I am so fond of having reporting data sources be stored procedures instead of just writing the query right into the report. While that is not truly the scope of this post, I will say that I really like having data access code in the database. Also, the security implications are great, since with sprocs, users need only Execute permission on the sproc and none against the underlying tables. There are other reasons, too, but those two are enough for now.

Setting Up The Data

Let’s start off by creating a table to house our data. I am using AdventureWorks (to make it easy) but creating my own schema (to keep things clean). NOTE: I looked but could not find any ScoobyDoo references in AdventureWorks.

USE AdventureWorks

GO


CREATE SCHEMA MarkVSQL

GO


CREATE TABLE MarkVSQL.ScoobyDooCharacter

(

      CharacterID int not null IDENTITY(1,1)

    , CharacterName varchar(10) not null

)


INSERT INTO MarkVSQL.ScoobyDooCharacter VALUES('Fred')

INSERT INTO MarkVSQL.ScoobyDooCharacter VALUES('Daphne')

INSERT INTO MarkVSQL.ScoobyDooCharacter VALUES('Velma')

INSERT INTO MarkVSQL.ScoobyDooCharacter VALUES('Shaggy')

INSERT INTO MarkVSQL.ScoobyDooCharacter VALUES('Scooby Doo')

NOTE: You may be thinking that Scrappy Doo is conspicuously absent from my list. There is a good reason for that. I can’t stand Scrappy Doo. He drives me nuts. I would rather bite down on a metal fork really hard with my front teeth than watch Scrappy Doo. </Scrappy Doo>

Creating Available Values List

Let’s create the stored procedure that will supply our Character parameter with available values. This is where we start to really have some fun.

CREATE PROCEDURE MarkVSQL.GetMysteryIncMemberList


AS


SELECT

      CharacterName

    , '<Character ID="'

        + CONVERT(varchar,CharacterID)

        + '"/>' AS CharacterIDXML

FROM MarkVSQL.ScoobyDooCharacter

This stored procedure returns the CharacterName along with the CharacterID field that has been modified to return the CharacterID value formatted as an xml node instead of just the int. Here is the fabulous output of our MarkVSQL.GetMysteryIncMemberList sproc.

CharacterName CharacterIDXML

------------- -------------------

Fred          <Character ID="1"/>

Daphne        <Character ID="2"/>

Velma         <Character ID="3"/>

Shaggy        <Character ID="4"/>

Scooby Doo    <Character ID="5"/>

Creating Data Source Sproc 

Now we create the stored procedure that will supply our report with data.

CREATE PROCEDURE MarkVSQL.GetMysteryIncMembers


    @CharacterID varchar(max)


AS


DECLARE @CharacterIDXML xml


SET @CharacterIDXML = REPLACE(@CharacterID,',','')


SELECT

      c.CharacterName

FROM MarkVSQL.ScoobyDooCharacter c

WHERE c.CharacterID IN

    (SELECT c.value('@ID','int') FROM @CharacterIDXML.nodes('//Character') AS x(c))

There are several things to note about this proc:

  • The parameter is a varchar(max) to allow as much space as we can for the string of comma separated XML nodes that SSRS will pass in.
  • We then declare an XML typed variable, @CharacterIDXML.
  • We remove the commas (which SSRS automatically adds as value separators) from the contents of the @CharacterID parameter and put the resulting list of XML nodes in the @CharacterIDXML variable.
  • Our WHERE clause uses the XML “nodes” method to shred out the CharacterID values from the XML.

Let’s run our MarkVSQL.GetMysteryIncMembers sproc with various parameters as they would be passed in from SSRS.

In this example, we just want to return Fred.

EXEC MarkVSQL.GetMysteryIncMembers '<Character ID="1"/>'

We get the following results:

CharacterName

-------------

Fred


(1 row(s) affected)

Now let’s get Fred and Daphne together. I think it is no secret that there is a spark between them.

EXEC MarkVSQL.GetMysteryIncMembers '<Character ID="1"/>,<Character ID="2"/>'

Here they are.

CharacterName

-------------

Fred

Daphne


(2 row(s) affected)

Now let’s get all of those meddling kids and their dog.

EXEC MarkVSQL.GetMysteryIncMembers '<Character ID="1"/>,<Character ID="2"/>,<Character ID="3"/>,<Character ID="4"/>,<Character ID="5"/>'

Here they are, in all of their mystery solving glory.

CharacterName

-------------

Fred

Daphne

Velma

Shaggy

Scooby Doo


(5 row(s) affected)

The configuration of the parameter in SSRS is nothing out of the ordinary, so I don’t feel it is necessary to go into the step by step process here. You can go here if you need more guidance on the SSRS piece, you can go here: Adding Parameters to Your Report. The article in this hyperlink is for 2008 but includes a hyperlink to the 2005 version as well. The configuration goals are the same, but interface differences between 2005 and 2008 make the exact steps a little different.

You just configure the @CharacterID parameter of the report to do the following:

  • Allow multiple values
  • Get its available values from the MarkVSQL.GetMysteryIncMemberList sproc.
  • Use the CharacterName field as the “Label” field so that the user is presented with the list of names.
  • Use the CharacterIDXML field as the “Value” field so that our XML nodes in a comma separated string are passed to the stored MarkVSQL.GetMysteryIncMembers sproc, just like in our examples above.

That’s really all there is to it. Roh boy!

Enforcing Uniqueness On A Nullable Column

I recently found myself needing to enforce uniqueness on a column which was nullable. To make things interesting, there were already thousands of records for which the field was already NULL and would remain NULL. A unique index on the column was not possible since I had more than one NULL value. I therefore had to come up with another option. After many deep, profound, brain things inside my head, I had come up with a horribly convoluted solution involving duct tape, a Swiss Army knife, 17 sporks, and a hamster named Ginger. I think we can all see why this would not be the best option.

A colleague pointed me to this blog, featuring a comment by Mr. Adam Machanic.

http://weblogs.sqlteam.com/brettk/archive/2005/04/20/4592.aspx

It involved creating a view which returns only non-NULL values for the column in question and then placing an index on that view. Fabtastic! WAY easier than the solution I was hatching myself. Note that there are rules regarding the creation of indexed views to be aware of. Those rules are detailed here: http://msdn.microsoft.com/en-us/library/ms188783.aspx.

Here is how this works.

We start with a database table containing super heroes. One thing to note about these particular super heroes is that none of them have sidekicks.

USE tempdb

GO


CREATE TABLE Superhero

(

       SuperheroID int NOT NULL IDENTITY

     , SuperheroName varchar(25) NULL

)


INSERT INTO Superhero (SuperheroName) VALUES('Superman')

INSERT INTO Superhero (SuperheroName) VALUES('Wonder Woman')

INSERT INTO Superhero (SuperheroName) VALUES('Spiderman')


SELECT 

       SuperheroID

     , SuperheroName

FROM Superhero


/*

RESULTS:


SuperheroID SuperheroName

----------- -------------------------

1           Superman

2           Wonder Woman

3           Spiderman


*/


Now, we need to import super heroes with sidekicks and bring their sidekicks into our table as well. We are also tasked with ensuring that no two super heroes can have the same sidekick name.

Let’s add a SidekickName column to our table and toss some sidekicked superheroes into our table.

ALTER TABLE Superhero ADD SidekickName varchar(25)


INSERT INTO Superhero (SuperheroName, SidekickName) VALUES('Batman', 'Robin')

INSERT INTO Superhero (SuperheroName, SidekickName) VALUES('Dangermouse', 'Penfold')


SELECT 

       SuperheroID

     , SuperheroName

     , SidekickName

FROM Superhero


/*

RESULTS:


SuperheroID SuperheroName             SidekickName

----------- ------------------------- -------------------------

1           Superman                  NULL

2           Wonder Woman              NULL

3           Spiderman                 NULL

4           Batman                    Robin

5           Dangermouse               Penfold


*/


So now we have some sidekicks and some superheroes who tend to work alone and have NULL in the SidekickName field. Just to show I am not making things up when it comes to unique indexes, let’s go ahead and try putting a unique index on the Superhero table and see what happens.

CREATE UNIQUE NONCLUSTERED INDEX ixSidekick ON Superhero (SidekickName ASC)


Here is the error returned:

Msg 1505, Level 16, State 1, Line 51

The CREATE UNIQUE INDEX statement terminated because a duplicate key was found for the object name 'dbo.Superhero' and the index name 'ixSidekick'. The duplicate key value is (<NULL>).

The statement has been terminated.


Blast!

< insert villain-style monologue here concerning the feebleness of the superhero of your choice >

Let’s create our view. There are two important things to notice about this statement below. The view must be created using the WITH SCHEMABINDING option. Also, although I have not been using the two-part table name dbo.Superhero thus far, I MUST do so in order to create this schemabound view.

CREATE VIEW dbo.vSuperheroSidekick

WITH SCHEMABINDING

AS

SELECT

       SuperheroID

     , SuperheroName

     , SidekickName

FROM dbo.Superhero

WHERE SidekickName IS NOT NULL


Let’s query our view.


SELECT

       SuperheroID

     , SuperheroName

     , SidekickName

FROM vSuperheroSidekick


/*

RESULTS:


SuperheroID SuperheroName             SidekickName

----------- ------------------------- -------------------------

4           Batman                    Robin

5           Dangermouse               Penfold


*/


Fabtastical. So far so good. Now this is where it gets cool. Let’s create our UNIQUE CLUSTERED index on our new view.

CREATE UNIQUE CLUSTERED INDEX ix_vSuperheroSidekick_SidekickName_Unique

ON vSuperheroSidekick (SidekickName ASC)

GO


Now, let try inserting a new superhero, Safetyrat, with his diminutive sidekick, Penfold (sound familiar to you?):


INSERT INTO Superhero (SuperheroName, SidekickName) VALUES('Safetyrat', 'Penfold')


We get the following error:

Msg 2601, Level 14, State 1, Line 1

Cannot insert duplicate key row in object 'dbo.vSuperheroSidekick' with unique index 'ix_vSuperheroSidekick_SidekickName_Unique'.

The statement has been terminated.


HAZZAH! The attempt to inject a lame mockery of the ace, the greatest, has been foiled by our fabulous indexed view. Take THAT Baron Greenback!

NOTE: In my situation, I was dealing with a table that did not have a lot of writes, so that added overhead of maintaining this indexed view was not a concern. You will want to take this into consideration in your own environment.

Don’t forget to clean up after yourself:

DROP VIEW dbo.vSuperheroSidekick

DROP TABLE Superhero

Using Medians For Quartiling When NTILE Is Too Arbitrary

So, in a previous post on The Coolness of the T-SQL NTILE Function, I discuss that NTILE can perform quartiling (or any other –tiling not requiring a trip to Home Depot) for you. Very cool. However, there is something worth noting about this function that I discovered the hard way. I will continue with my quartile example.

If you are quartiling based on a single field (or a small number of fields) and there is a possibility that more than one record could have the same values in the fields by which you are quartiling, it is possible for records with the same value to end up in different quartiles. Doh.

The reason for this is that NTILE essentially just orders your records by the field specified in the ORDER BY clause and then places the first 25% of the records in quartile 1, the second 25% in quartile 2, etc. So, if you have 8 records, as in my example below, the first two records go in quartile 1, the second two go in quartile 2, etc.

Let’s see this in action to make sure I am not just making this stuff up.

USE tempdb

GO


CREATE TABLE TestValue

(

       Record char(1) NOT NULL 

     , Value1 int NOT NULL

)


INSERT INTO TestValue (Record, Value1) VALUES('A',2)

INSERT INTO TestValue (Record, Value1) VALUES('B',2)

INSERT INTO TestValue (Record, Value1) VALUES('C',2)

INSERT INTO TestValue (Record, Value1) VALUES('D',4)

INSERT INTO TestValue (Record, Value1) VALUES('E',6)

INSERT INTO TestValue (Record, Value1) VALUES('F',6)

INSERT INTO TestValue (Record, Value1) VALUES('G',8)

INSERT INTO TestValue (Record, Value1) VALUES('H',8)


In the code above, note that Record B and Record C have the same exact value in Value1.

/*

Quartiling with NTILE

*/

SELECT

       tv.Record

     , tv.Value1

     , NTILE(4) OVER(ORDER BY tv.Value1 ASC) AS Quartile_NTILE

FROM TestValue tv


The query above produces this result set:


Record Value1      Quartile_NTILE

------ ----------- --------------------

A      2           1

B      2           1

C      2           2

D      4           2

E      6           3

F      6           3

G      8           4

H      8           4


Note that although Records B and C have the same Value1 value, NTILE puts them in different quartiles. As previously stated, doh. Since I am doing my ORDER BY only a single column for which duplicate values are present, NTILE makes somewhat arbitrary decisions within the subsets of each Value1 value and puts Record C in quartile 2 instead of 1. If uniqueness were assured on my Value1 field, then NTILE would be an easy and accurate way to go. But not so much in this case.

I decided that the median would be my champion. Itzik Ben-Gan provides the basis for my median calculation here: http://www.sqlmag.com/Article/ArticleID/49827/sql_server_49827.html.

I ended up calculating 3 median values:

1. Median (I called Median50) across Value1 for all records, forming the 50th percentile boundary and hence the boundary between quartiles 2 and 3.

2. Median (I called Median25) across records whose Value1 <= the Median50, forming the 25th percentile boundary and hence the boundary between quartiles 1 and 2.

3. Median (I called Median75) across records whose Value1 > the Median50, forming the 75th percentile boundary and hence the boundary between quartiles 3 and 4.

Here is the final code for calculating my own quartiles and ensuring that records with the same value end up in the same quartile:

;

WITH


/*

Calculate the median over all records

This forms the boundary between quartiles 2 and 3

This must be calculated first since it is needed to calculate the 

other quartile boundaries

*/


Median50 AS

(

  SELECT Record, Value1,

    ROW_NUMBER() OVER(ORDER BY Value1) AS RowNum

  FROM TestValue

)

,

MedianResults50 AS

(

SELECT 1 AS JoinField,CAST(AVG(Value1) AS dec(7,3)) AS Median50

FROM Median50

)

,


/*

Calculate the median over records whose value is <= the overall median

This forms the boundary between quartiles 1 and 2

*/


Median25 AS

(

  SELECT Record, Value1,

    ROW_NUMBER() OVER(ORDER BY Value1) AS RowNum

  FROM TestValue

INNER JOIN MedianResults50 m

ON m.JoinField = 1

WHERE Value1 <= m.Median50

)

,

MedianResults25 AS

(

SELECT 1 AS JoinField,CAST(AVG(Value1) AS dec(7,3)) AS Median25

FROM Median25

) 

,


/*

Calculate the median over records whose value is < the overall median

This forms the boundary between quartiles 3 and 4

*/


Median75 AS

(

  SELECT Record, Value1,

    ROW_NUMBER() OVER(ORDER BY Value1) AS RowNum

  FROM TestValue

INNER JOIN MedianResults50 m

ON m.JoinField = 1

WHERE Value1 > m.Median50

)

,

MedianResults75 AS

(

SELECT 1 AS JoinField,CAST(AVG(Value1) AS dec(7,3)) AS Median75

FROM Median75

)


/*

Final SELECT using a CASE statement to assign quartiles based on 

my various medians

*/

SELECT

       tv.Record

     , tv.Value1

     , NTILE(4) OVER(ORDER BY tv.Value1 ASC) AS Quartile_NTILE

     , CASE

          WHEN tv.Value1 <= m25.Median25 THEN 1

          WHEN tv.Value1 BETWEEN m25.Median25 AND m50.Median50 THEN 2

          WHEN tv.Value1 BETWEEN m50.Median50 AND m75.Median75 THEN 3

          ELSE 4

       END AS MyQuartile

FROM TestValue tv

INNER JOIN MedianResults25 m25

ON m25.JoinField = 1

INNER JOIN MedianResults50 m50

ON m50.JoinField = 1

INNER JOIN MedianResults75 m75

ON m75.JoinField = 1


-- Cleaning up

DROP TABLE TestValue


Here is the result set produced:


Record Value1      Quartile_NTILE       MyQuartile

------ ----------- -------------------- -----------

A      2           1                    1

B      2           1                    1

C      2           2                    1

D      4           2                    2

E      6           3                    3

F      6           3                    3

G      8           4                    4

H      8           4                    4


You can see in the result set above that my median-style quartiling ensures that records with the same Value1 value end up in the same quartile.

Thus, in situations where the fields over which you are quartiling are guaranteed to produce unique values across your data set, then NTILE can be a great way to go. However, if there can be dupes, you may want to consider my approach above.